Showing posts with label Computer Tips and Tricks. Show all posts

Thursday, 15 November 2012

Simple Trick To Use Bold and Underlined Text in Facebook Chat

All the people are using facebook and sending a message to his friends.but this facebook message has some hidden trick.this tricks are very interesting and very funny.

Now follow the steps to send bold and underlined text in facebook chat.
1.go to facebook.com and login
2.then select any people to chat
3.for bold type any word with *(star).
example: hy *friends* then it displayed in hy friends
4. for underlined text just type any word with _(underscore)
example: hy _friends_ then it displayed in hy friends
thats all use this trick and share to your friends.if any problem then comment here

View Stored Password in Mozilla Firefox

Mozilla firefox is the best browser and it consists more features then flexible to users.Many browser's are protect the saved passwords and difficult to view it.
but the firefox provide a new option. That is view the stored password. This option are helps to users when the password are forgot. But this same way are used to stolen the password from others.

Method 1:

Step1:
go to Tools –> options and then click security tab.
step2:
Click on the Saved Password button then it can be opened in new window.
step3:
Click on the show passwords button.
now it will be ask to you a small alert for view this password just press yes.
step4:
now select the wanted website to view the password.

Method 2:

*go to the any login page like facebook,gmail
*right-click anywhere on the page.
*Select View Page Info and then the Security tab.
*Click View Saved Passwords. Another window will pop up showing the usernames associated with that site.
*Click Show Passwords to see the passwords for each username.

Wednesday, 14 November 2012

Open/Unblock YouTube in Pakistan

These three methods to open any blocked website like YouTube in Pakistan are for different users according to their usage.

1. Normal Users;
This method is for all those who just want to watch videos on YouTube and want to unblock YouTube only for watching videos. All those people are requested to open any of the following websites.
www.proxfree.com OR
www.kproxy.com

Inside the box just write down YouTube.Com and press Enter button, YouTube will be open and you can browse/download videos from YouTube on your normal speed. In these methods you cannot login to your YouTube Account.

2. YouTube Video Downloaders;
This method is for all those who want a maximum speed of download for YouTube videos, they are requested to open the following website.
www.hotspotshield.com and download the software (free) after installing the hotspotshield enable the software and browse for YouTube videos.
In this method you will be able to login to your YouTube account and can watch YouTube videos without any problem of speed. You will get the maximum speed for download that you have. In this method you cannot upload videos to your YouTube account.

3. YouTube Video Uploaders;
This method is for all those who want to upload videos to their YouTube account. Simply logon to www.spotflux.com and download the spotflux. After installing enable the software and start uploading videos to your YouTube account. Please do not download videos using this method because it reduces the speed upto 3 times than your original one, but so far the best way to use for uploading videos to YouTube Account where YouTube is blocked.

IMPORTANT: Someone has commented that his/her connection was terminated by PTCL, I am using these proxies for last two years since YouTube and Facebook was firstly blocked in Pakistan by PTA.
For more updates please subscribe to my Blog or Join my Facebook Page.

Tuesday, 6 November 2012

Use USB Flash As Ram In Pc

You might have noticed that your computer (window vista and xp) runs so slow while working on it, this might be as a result of low Ram space or large programs being utilized.
Today you're on the path to learn how you can use your Flash Drive as a Ram to boost up the speed of your Pc.
Many don't know the software with the name "eBoostr" while few know about it but not knowing what it's used for. eBoostr is a computer software that allows you use your USB Flash Drive as a Ram.
To learn how you can turn your USB Flash Drive into a Ram just follow the steps below :

Using USB Flash As Ram

1. You have to download the eBoostr Software which comes as zip, Unzip and Install it. The Software being a Trial Version only allows you to use it for about 5 Hours at a go. Like wise the purchased version the trial version never expires but denies you the option of using it as long as you wish like the purchased version.
So if the trial version stops working after 5 Hours, all you have to do is just restart your Pc and start using it.
You can download the free Trial version of "eBoostr."

2. After Installation Reboot your computer when ask to, Don't Ignore the Notification.

3. After your PC is been Restarted, Insert your USB Flash Drive then Open the eBoostr Software that you earlier Installed on your PC.

4. In the Program eBoostr window, Go to Edit -> Add New Cache Device, select your USB disk at the left screen and click Ok. And it will start caching the memory in your USB drive.

Monday, 5 November 2012

USE KEYBOARD WITH MOUSE (ON SCREEN KEYBOARD)

Use Keyboard with mouse
If you feel that your external keyboard is not working properly or some particular key is not functioning then you can use internal keyboard on your desktop screen. This property of keyboard is found in windows xp and seven. Just follow these steps
Go to start menu and press “run
Type  “osk
Now press enter.
(note. Don’t use commas)
you will see keyboard on your desktop screen. Now use mouse to click on keys for operation.

Convert Image to Icon with Any to Icon Converter

image to icon converterAny to Icon 3.51 converts BMP, JPEG, GIF, PNG, PCX, PSD, TGA, TIFF, WMF, WBMP, XPM, XBM and CUR formats into Windows icons. You can add files and folders from Windows Explorer or other file shells using drag and drop. You also can paste bitmaps from the clipboard and change color resolution and size to create customized icons. It's possible to convert 256-color icons into True Color icons and vice versa.

In addition, you can split icon libraries into individual icons. Any to Icon allows you to extract icons from folders and libraries and place them into the directory of your choice.

The application has wizard and command line interfaces that make it simple to process multiple files at once. You can find many images on the Internet and convert them to icons for use on your Windows desktop, in applications and elsewhere.

Supported formats:
  • ICO - Windows Icon
  • CUR - Windows Cursor
  • BMP - Windows Bitmap
  • GIF - Compuserve Graphics Interchange Format
  • JPG - JPEG JFIF Image
  • PNG - Portable Network Graphics
  • PCX - ZSoft Publisher’s Paintbrush Image
  • PSD - Adobe Photoshop Image
  • TGA - Truevision Targa Image
  • TIF - TIFF Image
  • WMF - Windows Metafile
  • EMF - Enhanced Windows Metafile
  • WBMP - Wireless Bitmap
  • XBM - X Bitmap
  • XPM - X Pixmap
  • ICL, EXE, DLL, SCR, IL, NIL and other icon libraries
System requirements:
 Windows 95/98/ME/2000/NT/XP/2003/Vista/7/8, 32 MB RAM, Pentium-233 MHz, 15 MB Hard Disk.

Trial limitations: Nag-screen, only 5 files can be converted only at once, 30 trial runs allowed.

Friday, 2 November 2012

Protect only certain Cells, Columns or Rows in Excel

excel2007In the last post we saw how to Protect and Unprotect Excel sheets with password in general and in this post for advanced users who want just to protect only certain cells, columns, rows in an Excel sheet. This makes only certain sensitive cells as read-only while allowing the user to edit other cells or information.

So how to protect only certain cells in Excel 2007?

This tip is written for Excel 2007 but the idea maybe applied to earlier version like Excel 2003.
When you protect a sheet all the contents are protected because by default all the cells are set to be locked.
So Press the Keyboard Shortcut Ctrl + A to select all the cells of the sheet. Right click and choose Format cells. Go to the Protection tab and uncheck Locked option and click Ok.
Unlock all cells and columns in Excel 2007
Now select only the cells or columns, rows that you want to protect. Right click and choose Format cells again. Go to the protection tab and check Locked option and click Ok.
Protect only certain cells in Excel 2007
Go to Review tab, click Protect Sheet and protect the sheet using a password. See the previous post (How to Protect and Unprotect Excel Sheets) for more details.
Protect Sheet in Excel 2007
Now only certain cells of the sheet will be protected.
To unprotect, just go to the review tab, and click Unprotect sheet and enter the password.

Additional Tips: If you want users to be able to change the colors or fonts, choose format cells, columns and rows option while you protect the sheet.

Thursday, 1 November 2012

Convert a Numeric Value into English Words in Excel

This article contains sample Microsoft Visual Basic for Applications functions that you can use to convert a numeric value in a Microsoft Excel worksheet cell into its equivalent in English words.

Microsoft provides programming examples for illustration only, without warranty either expressed or implied. This includes, but is not limited to, the implied warranties of merchantability or fitness for a particular purpose. This article assumes that you are familiar with the programming language that is being demonstrated and with the tools that are used to create and to debug procedures. Microsoft support engineers can help explain the functionality of a particular procedure. However, they will not modify these examples to provide added functionality or construct procedures to meet your specific requirements.


How to create the sample function Called SpellNumber

  1. Start Microsoft Excel.
  2. Press ALT+F11 to start the Visual Basic Editor.
  3. On the Insert menu, click Module.
  4. Type the following code into the module sheet.

    Option Explicit
    'Main Function
    Function SpellNumber(ByVal MyNumber)
        Dim Dollars, Cents, Temp
        Dim DecimalPlace, Count
        ReDim Place(9) As String
        Place(2) = " Thousand "
        Place(3) = " Million "
        Place(4) = " Billion "
        Place(5) = " Trillion "
        ' String representation of amount.
        MyNumber = Trim(Str(MyNumber))
        ' Position of decimal place 0 if none.
        DecimalPlace = InStr(MyNumber, ".")
        ' Convert cents and set MyNumber to dollar amount.
        If DecimalPlace > 0 Then
            Cents = GetTens(Left(Mid(MyNumber, DecimalPlace + 1) & _
                      "00", 2))
            MyNumber = Trim(Left(MyNumber, DecimalPlace - 1))
        End If
        Count = 1
        Do While MyNumber <> ""
            Temp = GetHundreds(Right(MyNumber, 3))
            If Temp <> "" Then Dollars = Temp & Place(Count) & Dollars
            If Len(MyNumber) > 3 Then
                MyNumber = Left(MyNumber, Len(MyNumber) - 3)
            Else
                MyNumber = ""
            End If
            Count = Count + 1
        Loop
        Select Case Dollars
            Case ""
                Dollars = "No Dollars"
            Case "One"
                Dollars = "One Dollar"
             Case Else
                Dollars = Dollars & " Dollars"
        End Select
        Select Case Cents
            Case ""
                Cents = " and No Cents"
            Case "One"
                Cents = " and One Cent"
                  Case Else
                Cents = " and " & Cents & " Cents"
        End Select
        SpellNumber = Dollars & Cents
    End Function
          
    ' Converts a number from 100-999 into text 
    Function GetHundreds(ByVal MyNumber)
        Dim Result As String
        If Val(MyNumber) = 0 Then Exit Function
        MyNumber = Right("000" & MyNumber, 3)
        ' Convert the hundreds place.
        If Mid(MyNumber, 1, 1) <> "0" Then
            Result = GetDigit(Mid(MyNumber, 1, 1)) & " Hundred "
        End If
        ' Convert the tens and ones place.
        If Mid(MyNumber, 2, 1) <> "0" Then
            Result = Result & GetTens(Mid(MyNumber, 2))
        Else
            Result = Result & GetDigit(Mid(MyNumber, 3))
        End If
        GetHundreds = Result
    End Function
          
    ' Converts a number from 10 to 99 into text. 
    Function GetTens(TensText)
        Dim Result As String
        Result = ""           ' Null out the temporary function value.
        If Val(Left(TensText, 1)) = 1 Then   ' If value between 10-19...
            Select Case Val(TensText)
                Case 10: Result = "Ten"
                Case 11: Result = "Eleven"
                Case 12: Result = "Twelve"
                Case 13: Result = "Thirteen"
                Case 14: Result = "Fourteen"
                Case 15: Result = "Fifteen"
                Case 16: Result = "Sixteen"
                Case 17: Result = "Seventeen"
                Case 18: Result = "Eighteen"
                Case 19: Result = "Nineteen"
                Case Else
            End Select
        Else                                 ' If value between 20-99...
            Select Case Val(Left(TensText, 1))
                Case 2: Result = "Twenty "
                Case 3: Result = "Thirty "
                Case 4: Result = "Forty "
                Case 5: Result = "Fifty "
                Case 6: Result = "Sixty "
                Case 7: Result = "Seventy "
                Case 8: Result = "Eighty "
                Case 9: Result = "Ninety "
                Case Else
            End Select
            Result = Result & GetDigit _
                (Right(TensText, 1))  ' Retrieve ones place.
        End If
        GetTens = Result
    End Function
         
    ' Converts a number from 1 to 9 into text. 
    Function GetDigit(Digit)
        Select Case Val(Digit)
            Case 1: GetDigit = "One"
            Case 2: GetDigit = "Two"
            Case 3: GetDigit = "Three"
            Case 4: GetDigit = "Four"
            Case 5: GetDigit = "Five"
            Case 6: GetDigit = "Six"
            Case 7: GetDigit = "Seven"
            Case 8: GetDigit = "Eight"
            Case 9: GetDigit = "Nine"
            Case Else: GetDigit = ""
        End Select
    End Function
         

Block Websites in Firefox

There is an Add-on available for Mozila Firefox named “BlockSite” which helps users to block websites of their choices and password protect the settings to stop unauthorized changes. So just follow the simple process written below to block sites in Firefox.


Block Web Sites in Firefox

Step 1

Add BlockSite extension to Firefox
  • Click on Get Add-ons.
  • Type “blocksite” in search field.
  • Click on “Add to Firefox” button to install.
add Blocksite extension to Firefox

Step 2

Restart Firefox and navigate to “Tools” menu and select “Add-ons”

Firefox add-ons

Step-3

Select “Blocksite” from extensions list and click “Options”

Firefox extension

Step-4

  • On following window click on “Add” button to add URLs that you want to block.
  • Check the enable authentication check box and enter a password to protect from anyone to make changes in this block list.
Block websites list

Wednesday, 31 October 2012

Take a screen shot of Window XP

Ever see something on your screen that you’d like to email or save for later? With Microsoft Windows XP, you can take a screen shot and capture an exact image of what’s on the screen.

To take a screen shot and save it as a picture

  1. Click the window you want to capture. Press Alt+Print Screen by holding down the Alt key and then pressing the Print Screen key. The Print Screen key is near the upper-right corner of your keyboard. (Depending on the type of keyboard you have, the exact key names on your keyboard may vary slightly.)

    Note

    • You can take a screen shot of your entire desktop rather than just a single window by pressing the Print Screen key without holding down the Alt key.
  2. Click Start, click Accessories, and then click Paint.
  3. In the Paint window, click Edit, and then click Paste.
  4. When the image appears in the Paint window, click File, and then click Save As.
  5. In the Save As dialog box, in the File name box, type a name for the screen shot, and then click Save.
You can now print or email the saved screen shot just like you would any other picture.

Change Windows XP all sounds

You can personalize the sounds that your computer makes when different tasks happen, such as when you turn on your computer or when you receive an email or an instant message.
To obtain sounds, you can search the web for sound clips from your favorite songs, TV shows, and movies, and then download the clips to your computer. If you want to record your own sound clips, copy sound clips from a CD or DVD, or save anything else you can hear through your computer speakers, you can use Sound Recorder, a basic sound program that comes with Windows XP.
Sounds have to be in the .wav format; you can't use .mp3 or .wma sounds. Once you've downloaded or recorded some sounds, you can set them up to play in Windows.

To change the sound associated with a program event

  1. Log on to your computer as an administrator. Click Start, and then click Control Panel.
  2. Click Sounds, Speech, and Audio Devices.
  3. Click Change the sound scheme. The Sounds, Speech, and Audio Devices Properties dialog box appears.
  4. In the Program events list, click an event. Then, click the Play button to listen to the sound currently assigned to the event.
  5. To change the sound, click the Sounds list down arrow, and select a different system sound. To choose a sound that you have downloaded or recorded, click the Browse button, select the sound, and then click OK. Click the Play button again to preview the sound.
  6. When you are satisfied with your sounds, click Save As.
  7. In the Save Scheme As dialog box, type a name for your scheme, and then click OK.
  8. In the Sounds and Audio Devices Properties dialog box, click OK.

Tuesday, 30 October 2012

Change Windows 7 sounds

As usual, click on the link “Sounds”:
Windows 7 Sounds
Here, you will find all saved Windows 7 sound schemes:


Windows 7 Sound Schemes

Most of our themes come with new sound themes, which can be changed and customized here. If you want to apply a new sound file for “Critical Stop”, you simply click on “Browse” and locate the sound file that you want to assign for this error.

You can apply any WAV sound files as a replacement sound for:
“Asterisk”, “Close Program”, “Critical Battery Alarm”, “Critical Stop”, “Default Beep”, “Device Connect”, “Device Disconnect”, “Device Failed to Connect”, “Exclamation”, “Exit Windows”, “Low Battery Alarm”, “Maximize”, “Menu Command”, “Menu Pop-up”, “Minimize”, “New Fax Notification”, “New Mail Notification”, “Open Program”, “Print Complete”, “Program Error”, “Question”, “Restore Down”, “Restore Up”, “Select”, “Show Toolbar Band”, “System Notification”, “Windows Change Theme”, “Windows Logoff”, “Windows Logon”, “Windows User Account Control”, “Blocked Pop-up Windows”, “Complete Navigation”, “Empty Recycle Bin”, “Fax error”, “Fax sent”, “Feed Discovered”, “Incoming call”, “Information Bar”, “Move Menu Item”, “Search Provider Discovered”, “Start Navigation”.
Often you will also be able to customize sounds for special applications like iTunes or VNCviewer for example. So, there are quite a lot of sound files that you can change and customize.
If you are new to this, I would start with the most important sounds:
Asterisk, Critical Stop and Default Beep

Where can I download WAV sound files for my Windows 7 theme?

You can find, search and download sound files for Windows 7 here:
www.wavcentral.com/
www.ilovewavs.com/
www.moviewavs.com/

There are many sites out there, where you can download WAV files. You should also be looking for sound files that are SHORT, because it would be pretty annoying to hear a 12 minute long sound every time you receive an error message.

Create Windows 7 Themes

A lot of people ask me how to create Windows 7 themes. If you want to create some themes in Windows 7, you have to know that Microsoft made creating and sharing themes really simple, thanks to a new file format “.themepack”, which is basically a special ZIP format that includes cursors, sounds, wallpapers, icons, colors and more.
How to create Windows 7 Themes


First of all, to create Windows 7 themes open your “Personalize” Control Panel. To do that right-click on your desktop and click on “Personalize”:
On the following windows, you will be able to create, customize and share Windows 7 themes.
Create Windows 7 Themes & personalize
The highlighted items are the most important entries. You can change “Desktop Background”, “Windows Color”, “Sounds”, “Screensaver”, “Desktop Icons” and “Mouse Pointers”.

Create Windows XP Themes

  • 1
    Open and start Windows XP. There is no need to enter safe mode to create themes.
  • 2
    Click on the Start menu and select the "Control Panel" menu option.
  • 3
    Click on the "Appearance" link in the Control Panel window (if you are viewing the control panel in the default Windows XP view). If you would like to switch to the classic Windows Control Panel view, click the "Switch to Classic View" link.
  • 4
    Click the "Display" icon in the Control Panel. From here you will be able to control nearly every aspect of your Windows XP themes.
  • 5
    Click on the "Appearance" tab along the menu bar.
  • 6
    Experiment with different settings. Change fonts, colors and sizes. Tweak the way the menu buttons behave.
  • 7
    Click the "Desktop" tab to choose from the collection of wallpapers you have stored on your hard drive. You can choose to stretch, center or tile the wallpaper to make it appear the way you desire.
  • 8
    Change your screensaver to something that fits with the themes you are creating. Just choose from the list provided and change its parameters to see how it would look in different states.
  • 9
    Click back to the "Themes" tab, and then click "Save As..." in order to preserve the themes you create.
  • 10
    Delete a theme that you no longer wish to have by selecting the theme from the drop-down menu in the "Themes" tab and clicking "Delete." You will be asked to confirm your selection, at which point you may press "Yes" or "No" to complete the operation.

Monday, 29 October 2012

Add an image or logo to your Hotmail Email Signature

Slightly later than planned (sorry all you folks that have been waiting with baited breath) here it is, the Clarity guide to adding an image to your Hotmail signature.
Now you may want to design your whole signature as an image (like mine, pictured) or you may just want to add an image, perhaps your logo, on to some carefully chosen words.
After much hair-tearing-out and head-bashing-on-desk I have worked out how to do it, and now I am going to share the secret with you all!
Before we start, I am going to assume you have your Hotmail (or Windows Live Mail) account open on a webpage, and that you have the picture/image/logo you would like to include. In the right size- i.e. the size you would like it to appear at on the bottom of your emails.
The crucial first step is to realise that you cannot use an image saved on your computer. You need to upload the image on to the web somewhere. If you have your own website you can upload it there, add it to a post on your blog, or just use an online image repository like flickr.com. Open a webpage with your image on it. And off we go.

Step by Step
  • Click on your id in the top right hand corner of the Hotmail window, and select Options from the dropdown menu.
  • On the next screen click on Mail in the left hand menu
  • Click Personal e-mail signature under Writing email. This brings up a new screen with a blank ‘page’ for you to design your signature in. If you are doing a signature with some text in too, add your text now (it will be easier to position your image if the text is there first)
  • Click over to the web page containing the image or just load the image itself using its URL.
  • Highlight the image — just the image — with your mouse.
  • Press Ctrl-C (Windows, Linux) or Command-C (Mac).
  • Go back to Hotmail, position the cursor where you want to insert the image and press Ctrl-V (Windows, Linux) or Command-V (Mac).
  • If you have already inserted some text, you are now done, and can click Save. However, if you have a full image signature, you need to add some text in order for the Hotmail system to save it. I used a line of __________ , but you could use ******* or ——– or anything you like. If you do NOT add text, the image will not be saved in your signature.
  • Click Save.
  • Do a dance because you now have a pretty email signature in Hotmail. Simples.

Add or Change a Signature in Yahoo


  1. Click Options in the upper-right corner of your Mail page and select More Options.
  2. From the list on the left, click Signature.
  3. You can select Show a signature on all outgoing messages to enable the signature. Select Do not use a signature if you want to turn your signature off – or you can simply delete it manually from emails in which you’d rather not show it.
  4. On the far right of the message window, above the text area, click either Plain Text or Rich Text. Plain Text is just the letters. In Rich Text, you can work with color, font, size and style choices that you select from the toolbar.

    Note: For a Rich Text signature to appear in Rich Text, you must compose your email in Rich Text. Make that selection by clicking the Rich Text link in the Compose window, to the right of the Subject box.
  5. Next, add or change your signature by typing in the text area.
  6. At the top of the page, click Save Changes.
Your signature will now appear at the bottom of any message you compose.

Sunday, 28 October 2012

How to Change the Welcome/Login Screen in Windows XP ?

How to Change the Welcome/Login Screen in Windows XP ?
Seeing the same old blue screen each time you login to Windows XP can get quite boring for you with passing time. Probably the best way to get rid of this blue screen is to use the direct login feature and not see the welcome screen at all but for multi user computers the welcome screen acts as a login portal and you can not disable it whatsoever.

However there is a simple trick to change the welcome screen .
How to Change the Welcome/Login Screen in Windows XP ?


How would you Like this One ?
How to Change the Welcome/Login Screen in Windows XP ?
Change Windows Welcome (Login) Screen
Just make sure that you have the “Use welcome screen” option activated in

Control Panel –> Users Accounts –> Logon and Logoff Options
before trying to apply this trick.
Basically there are two ways to change your login screen.
First One is to either replace your default login screen with your new one and the other method is to play with the registry such that it recognizes the new login screen as the default one ..
The following steps will guide you how to over write your existing login screen with your new one.
Here are the steps :
1. Make a backup copy of C:\windows\system32\logonui.exe
2. Rename your new login screen to logonui.exe
3. Overwrite the existing login screen file with your new login screen and thats it you are done.
Second Method that will help Windows identify your new login screen as the default one. The good thing about this trick it that you don’t have to delete or replace your original login screen file. Here it goes.
1. Copy your custom login screen file under another name, let’s say logonuiA.exe, to C:\Windows\system3\
2. Open Start menu –> Run –> and type Regedit
3. Navigate to HKEY_LOCAL_MACHINE –> SOFTWARE –> Microsoft –> Windows NT –> CurrentVersion –> Winlogon and change the value for UIHost to logonuiA.exe.

Tuesday, 23 October 2012

How to Reset Windows 7 Administrator Password

Lost or forgot Windows 7 administrator password? This is the most common problem that Windows 7 users are usually confronted with. How to deal with it so that you can log back into your administrator account? Even if you don't have to reset a forgotten password now, you should get acquainted with this issue. I must admit that I managed to forget my password more than once. Here I'm going to show you 2 easy ways to reset Windows 7 administrator password, so you can log on your computer when you forgot the admin password.


Method 1: Use Other Administrator Account

If you can still log on to an account with administrator privileges, it's very easy to reset the password for any other user account, including the administrator account. Please follow these steps:
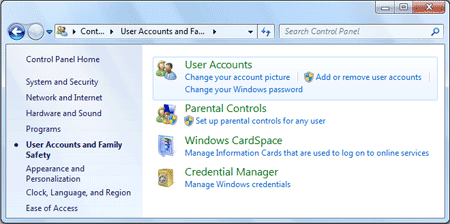
  1. Go to Control Panel and click on the User Accounts and Family Safety, then click on User Accounts.
    User Accounts
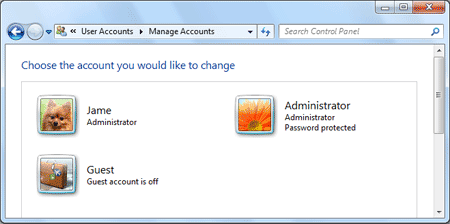
  2. In the next window, click on the Manage another account link, you'll see a list of Windows accounts.
    Windows Accounts
  3. Select the administrator account that you want to remove the password for.
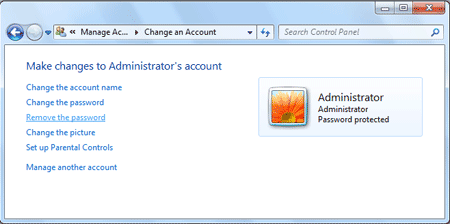
  4. Click on Remove the password link, it will blank your forgotten administrator password immediately.
    Remove Administrator Password
This method enables you to reset Windows 7 administrator password without using any software. But it requires you to log on through another admin account.


Method 2: Reset Windows 7 Administrator Password with Software

If you forgot Windows 7 password and can't log on to your computer with any administrator account, you need to create a Windows password reset disk which enables you to reset Windows 7 administrator password quickly and easily.
  1. Download the self-extracting Zip file of Reset Windows Password package.
  2. Unzip the download file, there is an ISO image: ResetWindowsPwd.iso. Burn it onto a blank CD/DVD or USB flash drive using ISO2Disc or any CD/DVD burning software you like.
  3. Boot your locked computer from the Windows password reset disk.
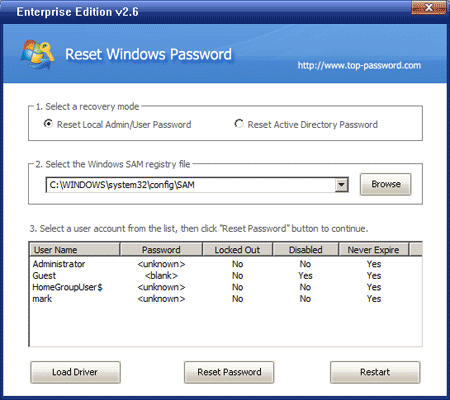
  4. Wait until the boot process is complete. When a window pops up with all your Windows accounts, select the administrator account and then click the Reset Password button.Reset Windows Password
  5. It will reset Windows 7 administrator password immediately.
Next, take out the Windows password reset disk and restart the computer. You can then log into administrator account without being asked for a password.

Saturday, 20 October 2012

Create different viruses

Yes, You can create your own fake viruses to fool you fiends and have some fun. Creating fake viruses is so much fun that reading and following along this article would seem like a game.
It is very easy it is to create a fake virus. You don’t even need advanced skills, but after creating the virus, I bet, you friends will be amazed and think of you as a master programmer. But, actually you do not even need progamming skills to master this art.
You can fool your friends by creating fake viruses that seem identical to a normal virus. It will also seem to behave like a normal virus, but actually won’t harm the system. Remember, Our primary goal is to have some fun. We do not intend to harm anyone’s system at all. Be honest, play safe.


Fake virus message
Introduction
Fake virus message can make your friends feel that a virus has infected their system. You can create fake virus message without harming your own or someone else's computer. This fake virus will just create a mental havoc, but actually won’t harm the system.This is the most basic virus you can create using notepad. You just need to type in your message and the message is displayed as soon as anyone clicks on the bat file you created using notepad. This kind of virus may threaten the user into believing that a virus has attacked their computer and is causing such messages!But only you, being the programmer of the virus know that the message is just a command prompt command and is actually not a virus. So, have fun creating your own custom messages to threaten the user!

How to do it
1. Open notepad. Click start => All Programs => Accessories => Notepad.
2. Now type the following in the notepad as shown in the screenshot below:
3. Now save as virus.bat & in the files type select- All Files.

Shutdown Time-out

Introduction
This kind of fake virus shows an error message & shuts down the computer within a time limit. The user does not get an idea to prevent the shutdown. This fake virus starts a countdown & turns off the computer just after the completion of the countdown.This kind of virus can threaten the user. It acts as if a virus has attacked the computer, damaged system files, damaged the operating system and deleted system data. (but you, the creator of the virus actually know that it won’t delete anything, heck. It won’t even do anything!).It acts as if a virus has attacked the system which is forcing a shut down on the system. This is a great way to have fun with your friends. You threaten them & after a moment when he turns on the computer, he finds nothing has happened at all!. Then you can tell them that it is a fake virus! Don’t blame me afterwards, after all, you created it!

How to do it
1. Right click on the desktop
2. Go to New => Shortcut
3.Now in the location of the item text box type shutdown -s -t 30 -c “Your message here“.

Endless command prompt Windows

Introduction
This kind of virus opens numerous command prompt windows, which in turn hangs the user’s system (in other words, freezes the system). You can create this kind of virus to hang the user’s system, and then there is no option but to turn off the system. The user cannot do anything to stop the command prompt windows from opening!There is a flow of endless Command Prompt windows which cannot be stopped by any methods. Not even task manager will help. Untill the time you decide and see the task manager windows, you will already have a hundreds of command prompt windows!To understand the technique behind the endless flow of command prompt Windows, read the description below in full:We create 2 files- 1.bat, 2.bat. Both of them (as you know) open with command prompt. Now when we open 1.bat, 2.bat automatically opens because 1.bat calls 2.bat & 2.bat again call 1.bat. This process of calling (or opening) each other continues endlessly. We open 1.bat which opens 2.bat. Now 2.bat again opens 1.bat & 1.bat opens 2.bat again. This process continues endlessly.1.bat => 2.bat => 1.bat => 2.bat => 1.bat => 2.bat ……………………. The process continues

How to do it
1. Open notepad.
2. Now type the following: start 2.bat.
3.Now save as 1.bat with save as type: All files.
4.Now open the untitled notepad again.
5.Now type start 1.bat & save as 2.bat in the same location as the previous file 1.bat.
6.Now you need to double click (or execute) any of the bat files created to check the working of the fake virus.

Deadliest virus!!!

Introduction
This is the most dangerous virus I am going to discuss with you in this article. In short, you may say, this is going to be the deadliest virus you are going to create after reading this section!So far, I have discussed about making three types of viruses. Out of which, endless command prompt windows virus works with all windows versions, whereas the other two viruses discussed may not work in windows vista and later version of windows because they have other commands for performing the task.In this section, I am going to teach you the art of creating an actual virus that may threaten a user and make him believe that his computer has been attacked by a real virus. In this section for creating the deadliest virus, we are going to integrate all of the above mentioned viruses into one single batch file.In this final virus, we will not only integrate the previously mentioned commands, but also add some more commands and functionality to make it look like a real threatening virus!!! Ok let’s get started…

How to do it
1. Open notepad.
2. Now type the following: @echo off echo Do you want to delete C:\windows and boot sector files? (Y/N) Pause >nul dir /s echo all files deleted pause msg * Windows has encountered a problem and needs to close. shutdown -s -t 30 -c "Windows has been targetted by Dipojjal virus. Unable to locate system.exe"
3. Now save the file as complete.bat (or any file name you like with .bat extension).Here is a screenshot to illustrate the above mentioned steps:

Disable Restart Prompt

Introduction
It is irritating when your mom tells you to turn off your computer when you are doing some important work or playing a game.
The restart prompt is just like that “mom”. It's frustrating when you get a prompt to restart your computer when you do not want to.
Why is it so & how does it happen?
When you are connected to the Internet, the important updates are automatically downloaded. After the completion of the windows update, you get a message to restart your PC.
Now this is the most irritating part. Imagine that you are browsing something that is very important to you & do not want to restart or get an advanced tension of restarting it later. I admit that you can click the button restart later, but what if you could permanently remove this nagging screen?
Voilla!!! You can remove this nag screen. You can disable restart prompt. Thanks to the registry editor!

How to do it
1.Click run located on the start menu.
2.Now type “regedit” and click OK.
3.Now you will encounter a registry editor screen.
4.In the registry editor screen, navigate to- HKEY_LOCAL_MACHINE\SOFTWARE\Policies > Microsoft\Windows
5.On the right pane, right click & select New => Key
6.Now a Folder is created.
7.Right click the folder created on the left pane & select New => Key
8.Now you will see a sub-folder. Rename this sub-folder to AU (AutoUpdate)
9.Now return to the right pane & select New => DWORD Value.
10.Now right click on the new DWORD Value created & change the name to- NoAutoRebootWithLoggedOnUsers & the value to 1 (value 0 means false & 1 means true).

Results
Now you are completed with the operation of preventing windows from showing that irritating, frustrating restart dialogue box. Now you may restart the windows to see the changes. From now, you wont be asked to restart windows after updating you system
A single restart for preventing the lifetime automatic restart. Seems like a profitable deal isn’t it?