Showing posts with label Pc Software. Show all posts

Thursday, 8 November 2012

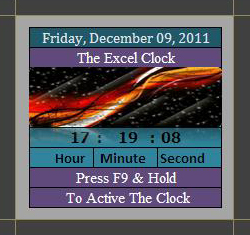
Create a Digital Clock On Excel.

You can create a clock in Excel 2003,2007,2010 in one or any cells using following formula

=TEXT(HOUR(NOW()),"00")&":"&TEXT(MINUTE(NOW()),"00")&":"&TEXT(SECOND(NOW()),"00")
And for the  Day, Month & Year you can uses the excel NOW function:
Formatting Process
=Now()
Picture
The Format the cell according to you need
Ctrl+F1 => Number => Date => Select format.

Tuesday, 6 November 2012

Locking & Unlocking Modem

Unlocking & Locking Modem
 
The following shows the two states of ModemLockDown within your Windows taskbar - Locked & Unlocked:
Unlocking

To unlock the modems and allow an internet use:
1. Click the ModemLockDown taskbar icon and then choose the Unlock Modems option.
The Unlock screen appears.
2. Enter the correct Unlock Password. The Unlock Modems buttons will remain inactive until the correct Unlock Password is entered.
Once enabled choose either the "Unlock Modems - No time restriction" or the "Unlock Modems - With time restriction" button. If the time restriction option is chosen, you must then select an unlock period. See below.
The taskbar icon changes to green, the modems are unlocked and an internet use can resume.

Internet Access with Time Restriction

You may provided limited and automated internet access without using the "Scheduled User Access" option.
To grant access for a certain time, select either the 'Unlock Modems - With time restriction' option when unlocking the modems (described above) or select the 'Change Unlock Period' during an existing access period.
You will be presented with the following screen where you can choose the access time period required. The user will recieve notification close to and at the time the internet will be disabled.

Locking

To lock the modems immediately and cease internet access:
Click the ModemLockDown taskbar icon followed by the Lock Modems option.
That's it! The modems are now locked, any existing connection has been dropped & no new connections can be made until an unlock is in effect.
NOTE: If the "Use User Schedules" locking option has been chosen, it is not possible to lock the modems while a scheduled Unlock is in effect. See Locking Options for more information about this.

Sunday, 4 November 2012

Convert a PDF File to Word, Excel or JPG Format

One common question I’ve run across a lot these days in the office is how to convert a PDF file to Microsoft Word format (doc), Excel format (xls), or JPG picture format. Usually, people want to know how to convert a file to PDF, but it’s also nice to be able to convert back the other way. Converting to Word is actually pretty simple and can be done directly using an online file conversion service called Zamzar. Going to Excel or JPG is a two step process, but nothing very difficult to follow.
Update: There’s a much easier way to convert a PDF to JPG image format than the method I have mentioned below. Here’s how you can do it using Zamzar.com.

Convert a PDF file to JPG – Easy Way

Go to ZamZar.com, browse for your file and choose PNG format for the format to conver to under Step 2. PNG is another newer picture format that is slowly replacing the JPG format. Most programs that can open JPG files can open PNG. Zamzar automatically converts each page in the PDF document into it’s own PNG picture file. Now you can simply open Microsoft Paint (yes, all you need it Paint!) and choose File – Save As from the menu and choose JPEG from the drop down list of formats.

microsoft paint

Convert PDF to JPG Format – Second Way

The first thing you’ll need to do is download a free software (the only one I could find) that converts PDF documents to JPEG image format automatically. Go to the Omniformat download page and download both Omniformat v8.3 and the PDF995 app. You will need to download and install PDF995 first before installing Omniformat. Once you have both programs installed, go to your Start Menu programs, find the program group Software995 and click on Omniformat.


software995.jpg

The only annoying thing about this program is that it requires you to view some ads for about 30 seconds! However, it’s better than paying $20 or $40 for a program just to do a simple conversion! It does pop up another instance of your browser window for the web site of each of the sponsors, but it does not install any spyware onto your computer (no popup ads). Once the program is loaded, you’ll see it has a section called “Watch Folders” and then a button at the bottom titled “Start Monitoring” and “Single Pass“.

pdf-to-jpg.jpg

Basically the way it works is that you need to COPY the PDF files you want to convert to JPG format to the C:\omniformat\watch folder and then press Single Pass. The program will look in that directory and convert each page of each PDF into a separate JPG file. If you click Start Monitoring, you can keep dropping PDFs into that folder and the program will automatically convert them into JPGs as long as the program is open. Note that the program DELETES the original PDF document that it uses, so that’s why you need to COPY the PDF document to the watch folder, not move it! You should now see your converted files like below:

pdf-to-jpg-convert.jpg

Convert your PDF to a Word document

Go to Zamzar.com and click the Browse button next to Step 1 and choose your file. By default, Step 2 will be set to DOC format, but you can choose to convert your PDF to other file types such as TXT, HMTL, RTF, etc. Type in your email address for Step 3 and click Convert.
file conversion
You should receive an email within a few minutes with a download link to your converted file. I have tried out this service on some pretty complex PDF documents with text in multiple columns, multiple images, etc and have been very impressed with it’s conversion accuracy.

Convert a PDF file to Excel format

We will again follow the steps above using Zamzar, but this time choose TXT as the format you want to convert to. Unfortunately, you can’t convert straight to Excel format, so we’ll have to go through the intermediary TXT format. Once you have downloaded the TXT file and saved it on your computer, open Microsoft Excel and go to File – Open and change the Files of Type combo box to All Files.

convert pdf to excel

Now you should see the converted text file in the list of files. Choose it and click Open. You’ll now be brought to the Text Import Wizard. You have to open the file in this manner because if you simply right-click and say Open With Excel, all of the text for each row will appear in the first column and not be separated.
For Step 1, choose Delimited from the two options listed.

convert pdf to word

Click Next and check off the Space checkbox as one of the delimiters. Each value should now be separated by a vertical line, indicating it’s going to be in a separate column.

convert pdf to jpg

Click Next and then click Finish. You can now save the file as an Excel file by going to File – Save As. There are a few drawbacks, however, as this conversion does not always work perfectly! For example, if the original Excel sheet had a column where there was text with spaces included, each word will be separated into it’s own column! Also, you won’t see any formulas or functions that may have been in the original Excel sheet, only the text.
It’s as easy as that! You can use many other image editing programs also such as Photoshop, Corel, etc, etc, but I chose Paint because that is universally available on just about every Windows computer.
Saturday, 3 November 2012

Make Your Own Movies on Your Computer

Make Your Own Movies on Your ComputerMake your own home movies that you can store and edit on your computer, convert to CD Rom, e-mail.
  1. Obtain a webcam. You don't need to have one of those fancy little white round ones. You can get a cheap one from Wal-Mart


  2. Choose Video Editing Software - Windows Movie Maker is available in Windows but if you are using a Mac try iMovie or Linux try AviDemux.
  3.  Check how to operate your webcam. Attach your camera to your computer via USB cord, normally included with camera. Make sure your camera is in WebCam mode. Find out how to put it in WebCam mode in your manual.
  4. Click Tasks in Windows Movie Maker.
  5. Click Capture video.
  6. Enter specific settings in the window that appear. You need to enter a title for the scene. Select Best Quality for Playback on my computer and then click Next. Now, position the camera correctly so that you can capture yourself.
  7. Click Start Capture to begin recording, and then click Stop Capture to stop recording.
  8. Click Finish.
  9. Start arranging movie clips. Drag your clips to the time-line/storyboard at the bottom of the page.
  10. Click View video effects. You can add effects to your video clips, such as increasing the brightness, easing in on the picture, and more!
  11. Add titles at the beginning, end credits and transitions. This step is optional.
  12. Burn your movies to a CD using third-party software or a pre-installed CD burner in your XP. You can also e-mail your movies to your friends!

Friday, 12 October 2012

How to resize a digital photo in Windows XP

Even though Windows XP seems to have everything included in its package, it has overlooked the need for an image resizing program. You could probably use the ms paint, however I have found an easier way. To resize a digital photo in Windows XP you simply have to pretend to send the picture through your email. In fact this little trick to resize a digital photo can be done on Windows Vista and Windows Seven if you have Thunderbird or Outlook installed on your computer. You can also batch resize photos using Picasa and Windows Live Photo Gallery.

What you need to resize a digital photo:

  1. You will need an email program on your computer such as Outlook, Outlook Express, or Thunderbird.
  2. This tutorial is for Windows. Basically any version.

Here is how to resize a digital photo in Windows:

  1. If your digital photos are stored in the My Pictures Folder, go to the start menu and choose My pictures
  2. Double click on the folder containing your digital photos that you want to resize. Select one or more photos by making them blue.
  3. Right click on the selection and choose to send to
  4. Then choose mail recipient.
resize a digital photo
  1. The Send Pictures Via Email dialog box will appear. If you choose to show more options, you can even pick the size of your photo.
  2. Press OK and a new message window will appear.
  3. Go to the file menu at the top and choose Save Attachments, and then choose where to save your photos.
  4. Close the new email dialog box because your photos have been resized and saved.
screenshot2

Notes on Resizing digital photos:

  • Press The Windows key + E to launch Windows Explorer. An easy way to browse for your digital photos in Windows xp.
  • If my pictures folder is not on the start menu, it will be located in the My documents folder.
  • In Windows Vista it is not necessary to use this tip as the mspaint program has been upgraded to resize photos.

Create a free photo cd slide show with Windows XP

A cd photo slide show is a great way to share photos with your friends and family. You can send them a cd in the post for as little as $1.00 and all they have to do is pout it in their computer and the photo slide show will start.
This is also handy for sending your photos to non computer savvy people who just like to have things work automatically without having to find the pictures or try to view them on their computer.

To create a photo slide show you will need:
  • A genuine copy of Windows XP.
  • You will need to download the free cd slide show power toy from the Microsoft website. Install the program by choosing run when the download has finished.
  • You will need some photos on your computer.
  • A blank cd.
How to choose photos for your cd slide show:

The simplest way to choose the photos for your cd slide show is to right click on the individual file and choose send to, then choose to send to your cd drive.
The file will be put in the writeable cd folder, waiting for more to be added. See more details on How to burn a Cd using Windows XP
If you want to select more than one photo at a time, hold the ctrl key down when you are selecting photos. When they are all blue, right click on a blue bit and choose send to cd drive.

Every time you add a file to the writeable cd folder a balloon notification will appear in the taskbar. You can double click on this balloon to see what you have added that is going to be burnt to a cd.
send to cd drivewriteable cd folder

How to make the photo cd slide show after adding photos:
  1. Double click on the balloon to open the writeable cd folder.
  2. Press on Write these files to CD in the left column. (See Screenshot below)
  3. Now the cd writing wizard will appear.
  4. Choose a name for your cd, then press next.
  5. Then choose Yes, add a picture viewer. Then press next.
  6. When you have finished your cd will have its own autorun.exe file on the cd which will start the slide show.

write files to cd
slideshow picture cd
Notes:
  • If the cd drive is not on auto play, when you insert the cd you can choose to view files and then double-click on the autorun.exe file.

Thursday, 11 October 2012

"S-Weather" The Best Portable Weather Tracker In Your System Tray

weather trackerFor the past couple of years, one of the first extensions that I’d get for a new browser installation is one that can track local weather. With services like iGoogle dead, I just need a way to quickly eye what conditions in my area are going to be like. Firefox and Chrome both have a lot of great extensions in that area, so it’s a no-brainer.
For something as important and as frequently-checked as the weather, I’d really prefer the browser not to be a dependency. What’s even better than being able to spot weather conditions in the browser is being able to check up on them in your Windows system tray. I am a system tray junkie. Portable applications really get me going, too. sWeather is awesome weather tracker software that remains portable and docks to your Windows system tray.

sWeather

weather trackerRunning sWeather is as easy as extracting it to the folder of your choice. As with all portable applications, I recommend it go either in your Dropbox or on a flash drive. Out of the box, sWeather only grabs at ~9,500 K of memory and it works on any version of Windows including and past XP.

Upon launching the application, you can see how many features are on the face of it. It comes preloaded with a location so that you can see all of the data it pulls. You’ll also notice that it now sits in your system tray, where the weather icon matches the conditions of the area (which I really love). Hovering the tray icon will also show a quick summary of the conditions.

Sunday, 7 October 2012

Firefox about Commands List

We love Firefox, so when our resident geek compiled this interesting list of "about" commands, we couldn't resist sharing it with you guys.
To use the about commands just type the it into the Firefox address bar.
about:
Just typing "about:" will show general and version information. It's kind of short for about firefox :)
about:mozilla
It's a firefox easter egg. Try it.
about:robots
New easter egg.
about:blank
Shows a blank page.
about:config
Shows Firefox configuration.
about:cache
Shows information about Firefox cache. You can even browse the files in the cache
about:credits
Shows the list of contributors who helped develop Firefox.
about:plugins
Displays a list of plugins installed on Firefox
about:buildconfig
Information about the particular build of Firefox. Of interest to only geeks :)
about:home
Shows home page of Firefox with Google search bar
about:support
Shows troubleshooting information
about:logo
Show the Mozilla Logo
about:memory
Shows memory usage of Firefox

Firefox Command Line for Developers

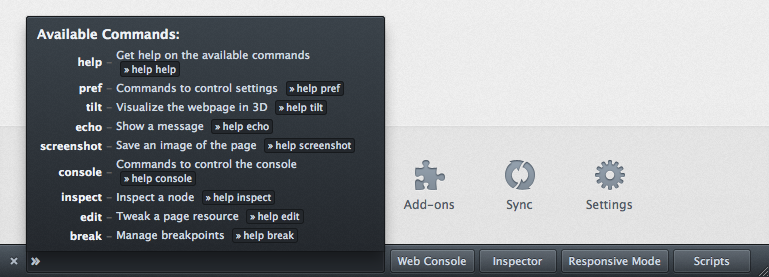
TL;DR: We're adding a toolbar to Firefox, for developers, which includes a command line. It's a great place to add small tools and experimental features, and we're making it easy to add your own commands.
The toolbar should land in Firefox 16 or 17 and will look like this:
GCLI on a Mac
The buttons are useful, but I'm most excited about the commands. We can add an almost unlimited set of commands here without cluttering up the UI, or making things slow, and we've done lots of work to make the command line easy to use.
The challenge: It might be stretching things a little to call the command line a 'platform', and commands 'apps', but the command line still needs commands to be successful. There's a list of commands that we're working on for manipulating Firefox developer tools, and we'll be expanding this list to include system level commands too.
We're planning on a hackathon in a couple of weeks to add to the list of commands and to check that it really as as easy as we think it is to extend. Details soon.
If you want to try it out, it's in Nightly now, you'll need to flip the devtools.toolbar.enable preference in about:config.