Friday, 19 October 2012

Remove welcome screen in "Window XP"

Introduction:
If you have only one user account & do not have a password for it, you can remove Welcome screen. Earlier I installed a software that turned on Welcome screen & it irritated me a lot because I had only one account to switch to & did not have a password for it, still had to click on my user account to open it every time I turn on my computer.
Generally, in such a case as outlined above, we do not need to click on the username, so we don’t have a welcome screen. But, sometimes some antiviruses or other softwaes may turn on the welcome screen. You need to click on your username everytime you turn on the computer.
Finally I decided to get rid of this unnecessary irritating welcome screen. I will teach you the same so that you can also remove welcome screen.

How to do it:
1.Click start.
2.Now click control Panel to open it.
3.Now click User Accounts.
4.Now in the pick a task section, click “change the way users log on or off”.
5.Now uncheck ‘Use the Welcome screen’.
6.Click apply option.

Brief how to do it:
Control Panel => User Accounts => Change the way users log on or off.

Convert "FAT32" to "NTFS"

Introduction
"Windows XP" have 2 types of file systemsm, which are given below.
  • FAT32
  • NTFS
You may keep any of the above mentioned file systems but, I recommend you to use NTFS file system because I have tried both files systems & concluded that NTFS has many advantages over FAT32 file system. That is why I created the article to convert FAT32 to NTFS file system, so that you can update your file system.
It would be worthless to convert NTFS to FAT32 file system. NTFS is a newer and better file system than FAT32. Here are some of the advantages of NTFS file system over FAT32 files system:
  • NTFS file system is much faster than FAT32.
  • NTFS drives can be compressed to save disk space.
  • NTFS drives have stronger security system than FAT32.
  • Administrator password on a FAT32 drive can easily be hacked, whereas doing so in an NTFS drive is difficult.
So, I recommend you to use NTFS file system rather than FAT32 files system as it is the latest, more secured, fast, and reliable file system than the previous FAT32 file system.

How to do it
1. Click "start"
2. Click "Run"
3. Type "cmd" (without ‘’ quotes)in the run dialog box & click OK
4. Now you should see the command prompt window. In the command prompt window, type ‘convert [driveletter]: /FS:NTFS’ (without ‘’ quotes).

Some examples to help you
1.convert c:/FS:NTFS- This will convert file system of C: drive from FAT32 to NTFS.2.convert d:/FS:NTFS- This will convert d: drive from FAT32 to NTFS.
Here is a screenshot illustrating conversion of FAT32 to NTFS:

Rename your recycle bin on desktop

Introduction:
Renaming the "Recycle Bin" can be a bit of fun because as I guess you would be pleased to hear your friend saying- wow how did you do it? It’s amazing, you are a genius. Does not it sound nice? I would not admit that renaming "Recycle Bin" is as easy as renaming other icons & even if I would, I would be lying to you.
This is because you cannot just right click Recycle Bin & select rename from the right click option. You will not even get the option to rename it. The option for renaming is not shown when you right click recycle bin icon. However, it would generally do so in case of any other file, folder or icon. You can not just rename the recycle bin icon in "Windows XP" using normal ways to rename. If you want to rename the recycle Bin, you would need to use the Registry Editor (a component included in Windows to edit, manage & maintain the registry).
But, it is still easy. Just follow the step by step procedure, you will breeze through the steps and the process would seem like a gameplay.

How to do it:
1.Got to start & click Run.
2.Now in the open dialog box, type ‘regedit
3.Now, you should see a registry editor screen as shown below:
4.Now navigate to: HKEY_CURRENT_USER\Software\Microsoft\Windows\Current Version\EXPlorer\CLSID\{645FF040-5081-101B-9F08-00AA002F954E}.
5.Now after navigating to the above mentioned address in the Registry Editor, You will see an entry called (Default) which has no value data. Right click it & select Modify.
6.Now in the value data type "Trash" (Without quotes) as shown in the screenshot below:
7.Now you are finished, so click OK & close the registry editor.
8.Now as soon as you refresh your Desktop, the boring Recycle Bin text is gone & you are ready with you new text- Trash.

Results:
Now as soon as you see the desktop, refresh the desktop by pressing "F5" & you are ready with the new name of Recycle Bin.Restart if you still do not see the changed name.

Change drive icon in "Window XP"

Introduction:

Changing drive icons in "Window XP" manually is very easy. The technique is similar to a "CD" with an autorun icon. If you know how various 'CDs" and "DVDs" display their own customized icons, You can easily change drive icon. It does not matter if you do not know. You can still change the drive icon.When you insert a game "CD", you can see an icon representing the "CD". The technique behind is similar to the technique I am going to teach you in this tutorial. Here are the screenshots of a normal game "CD" and another game "CD" with an icon:


Similarly you can change drive icons in "Window XP". Now I think you are ready for the action. Let's start.

How to do it:
1. Open any drive whose icon needs to be changed.
2. Now in the drive, create a notepad text document & open it.
3. Now in the notepad text editor, type the following-
[autorun]
Icon= name-of-the-icon-goes-here.ico
Here is a screenshot:
4. Now after typing the above code, go to file menu & click save as.
5. In the save as dialog box, select all files from the save as type drop down list.
6. Now in the file name text box, type- ‘autorun.inf’ to save the file.
7. Now restart your system & you will be able to see the effects just after the first restart.
NOTE: There should be 2 files- autorun.inf & an icon file. Both the files should be saved in the drive itself and the locations should be: D:\autorun.inf & D:\guddu.ico.
This means both the files should be in the same drive location & they should be placed under the parent drive itself not on any other folder.

Results:
As soon as you restart the computer, the drive icon changes.
Here is what happened after restarting my computer:

How to protect a compressed folder by requiring a password


You can restrict access to files and folders in compressed folders by requiring a password.

Important The password for a protected, compressed file is not recoverable. If you lose the password, you will be unable to access that file.

Note You cannot protect an empty compressed folder with a password.

To protect the contents of a compressed folder, follow these steps:
Double-click the compressed folder that you want to protect.
On the File menu, click Add a Password.
In the Password box, type the password that you want to use. Type the same password in the Confirm Password box, and then click OK.
Note When you try to move or open a file that is protected with a password, a Password Needed dialog box is displayed. Type the correct password in the Password box, and then click OK.

iPhone Secret Codes


*3001#12345#* + tap Call. Enter Field Mode. Field mode contains lots of iPhone internal settings, especially newest network and cell information.
*#06# It shows your IMEI number. IMEI number is a unique identification number for your mobile phone hardware.
*777# + tap Call. It shows account balance for prepaid iPhone.
*225# + tap Call. It shows 'Bill Balance' for Postpaid only.
*646# + tap Call. Using this you can check remaining minutes (Postpaid only).
*#21# + tap Call. It is used to set interrogation for call forwards. It discover the settings for your call forwarding. Using this you can check whether you have voice, data, fax, SMS,sync, async, packet access, and pad access call forwarding enabled or disabled on your iPhone.
*#30# + tap Call. It is used for check the calling line presentation. This shows whether you have enabled or disabled the presentation of the calling line, presumably the number of the party placing the call.
*#76# + tap Call. It is used to check whether the connected line presentation is enabled or not.
*#43# + tap Call. It is used to check if call waiting is enabled for your iPhone or not. It also shows call waiting status for voice, data, fax, SMS, sync data, async data, packet access and pad access. Each item is either enabled or disabled.
*#61# + tap Call. Used to check the number for unanswered calls. It also show the number for voice call forwarding when a call is unanswered and also show the options for data, fax, SMS, sync, async, packet access and pad access.
*#62# + tap Call. This code can be used to check the number for call forwarding if no service is available.
*#67# + tap Call. This code can be used to check the number for call forwarding when your iPhone is busy on another call.

Wednesday, 17 October 2012

Display Full Paths in the Address Bar

1.Open "My Computer" on the desktop.

2. Select "Tools", Then select "Folder Options".

3. When the "Folder Options" multi-tabbed dialog box appears, select the "View" tab.

4. Check "Display the full path in the address bar".

5. Click "OK".

Show or Hide Control Panel in My Computer

1. Open "My Computer", select "Tools", Then select "Folder Options".

2. When the "Folder Options" multi-tabbed dialog box appears, select the "View" tab.

3. Scroll down to "Show Control Panel in My Computer" and check or uncheck the box as desired.

4. Click "OK".

Tuesday, 16 October 2012

Change the Background Picture of Google

Google is rolling out a feature that allows you to change the background picture of Google.com to a user defined image. Here is how to customize your Google.com landing page background image.

Change the Google Background Image:

* Go to Google.com and be sure you are logged into your Google account.
* Hover over the bottom left corner of Google.com and click on “Change background image”.
* Select an image either from the Public gallery, Editor’s picks, your Picasa album, or an image from your       own computer.
* Click ‘select’ and close the window.
Your Google.com background is now set to a custom image.
change google homepage background picture
Google.com has long been very minimalist, but this is obviously taking a page from the Bing playbook. Bing has long included attractive images as the search engine home pages background picture, it is not particularly functional it is just attractive.

Remove the Google Background picture:

Removing the Google.com background wallpaper is just a matter of hovering over the lower left corner of the Google homepage and click on “Remove background image”
remove google homepage wallpaper background
You can also use an alternate Google local search engine, set the custom background to white, and some other techniques to remove the Google background if you hate it.

Lock Your Drives Without Using Any Softwares

Many of us like to have privacy for our computer. There may be files which we want to keep safe and hidden from others. There may also be some files which we don’t want others to find out like some important documents, office files,video’s etc.
Is there a way to hide my drives? Can I do it without the use of any softwares? Can I unlock my drives after locking it? etc, May be some of your questions when you see this post for the first time. Well, my answer is yes. We can either use a software to lock the drives or we can do it manually. In this post I am going to post on how to lock the Drives manually and vice versa.

1. Lock Drives via Registry Editor:

STEP 1 : Open Registry (go to run command, then type “regedit” and press ENTER)
STEP 2 : Then navigate to this key
HKEY_CURRENT_USERSoftwareMicrosoftWindowsCurre ntVersionPoliciesExplorer
STEP 3 : Now right click in right side panel and create DWORD Value (blue color)
Rename it as “NoViewOnDrive” (for locking drive)
or
Rename it as “NoDrives” (for Hiding drive)
STEP 4 : Double click on the newly renamed DWORD and put the numbers mentioned below corectly to lock your desired drives and then Click OK.
FOR A Drive : 1
FOR C Drive : 4
FOR D Drive : 8
FOR E Drive : 16
FOR F Drive : 32
FOR G Drive: 64
FOR H Drive: 128
STEP 5 : Finally restart or log-off the computer to take effect of the changes done.
Keep in mind that “0” (zero) is Default Value to Disable or remove this Setting.

2. Lock Drives via Group Policy:

STEP 1 : Goto “RUN” and type “gpedit.msc
STEP 2 : A window will be opened (Group Policy). On the left sidebar there would be two options.
STEP 3 : Drop down the “user configuration” and again drop down sub menu “Administrative Templetes” and again drop down another sub menu “Windows Components” and click on “Windows Explorer“.
STEP 4 : Right click on “Prevent Access To Drives From My Computers” and then click on properties.
STEP 5 : Click on the radio button “Enabled” and you can select any option in the menu.
To Disable the change made Follow the same procedure. Then click on radio button “Disable“.
If you have any doubts regarding my post please don’t hesitate to ask. Also let me know if any of the above mentioned trick doesn’t work for you.

Lock a folder in windows XP without any software

To Lock a folder in windows XP without any software. Follow the steps given below. Make a folder in "C" drive rename it as “abc” without quotes. Now open Command Prompt from Start Menu. Then type “attrib +s +h C:\abc” without quotes and press enter. This command will make your folder invisble and it can not be seen even in hidden files and folders To make it visible again type “attrib -s -h C:\abc” you can lock any other folder also by changing the location C:\abc to address of your folder.


To Lock a folder in windows XP without any software. Follow the steps Below. Make a Folder in C drive rename it as “abc” without quotes. Now open Command Prompt from Start Menu. Type “attrib +s +h C:\abc” without quotes and press enter. This command will Make your folder invisble and it can not be seen even in hidden files and folders To make it visible again type “attrib -s -h C:\abc” You can lock any other folder also by changing the location C:\abc to address of your folder.

Read more at: http://www.caclubindia.com/forum/lock-a-folder-in-windows-xp-without-any-software-181229.asp

Friday, 12 October 2012

How to resize a digital photo in Windows XP

Even though Windows XP seems to have everything included in its package, it has overlooked the need for an image resizing program. You could probably use the ms paint, however I have found an easier way. To resize a digital photo in Windows XP you simply have to pretend to send the picture through your email. In fact this little trick to resize a digital photo can be done on Windows Vista and Windows Seven if you have Thunderbird or Outlook installed on your computer. You can also batch resize photos using Picasa and Windows Live Photo Gallery.

What you need to resize a digital photo:

  1. You will need an email program on your computer such as Outlook, Outlook Express, or Thunderbird.
  2. This tutorial is for Windows. Basically any version.

Here is how to resize a digital photo in Windows:

  1. If your digital photos are stored in the My Pictures Folder, go to the start menu and choose My pictures
  2. Double click on the folder containing your digital photos that you want to resize. Select one or more photos by making them blue.
  3. Right click on the selection and choose to send to
  4. Then choose mail recipient.
resize a digital photo
  1. The Send Pictures Via Email dialog box will appear. If you choose to show more options, you can even pick the size of your photo.
  2. Press OK and a new message window will appear.
  3. Go to the file menu at the top and choose Save Attachments, and then choose where to save your photos.
  4. Close the new email dialog box because your photos have been resized and saved.
screenshot2

Notes on Resizing digital photos:

  • Press The Windows key + E to launch Windows Explorer. An easy way to browse for your digital photos in Windows xp.
  • If my pictures folder is not on the start menu, it will be located in the My documents folder.
  • In Windows Vista it is not necessary to use this tip as the mspaint program has been upgraded to resize photos.

Create a free photo cd slide show with Windows XP

A cd photo slide show is a great way to share photos with your friends and family. You can send them a cd in the post for as little as $1.00 and all they have to do is pout it in their computer and the photo slide show will start.
This is also handy for sending your photos to non computer savvy people who just like to have things work automatically without having to find the pictures or try to view them on their computer.

To create a photo slide show you will need:
  • A genuine copy of Windows XP.
  • You will need to download the free cd slide show power toy from the Microsoft website. Install the program by choosing run when the download has finished.
  • You will need some photos on your computer.
  • A blank cd.
How to choose photos for your cd slide show:

The simplest way to choose the photos for your cd slide show is to right click on the individual file and choose send to, then choose to send to your cd drive.
The file will be put in the writeable cd folder, waiting for more to be added. See more details on How to burn a Cd using Windows XP
If you want to select more than one photo at a time, hold the ctrl key down when you are selecting photos. When they are all blue, right click on a blue bit and choose send to cd drive.

Every time you add a file to the writeable cd folder a balloon notification will appear in the taskbar. You can double click on this balloon to see what you have added that is going to be burnt to a cd.
send to cd drivewriteable cd folder

How to make the photo cd slide show after adding photos:
  1. Double click on the balloon to open the writeable cd folder.
  2. Press on Write these files to CD in the left column. (See Screenshot below)
  3. Now the cd writing wizard will appear.
  4. Choose a name for your cd, then press next.
  5. Then choose Yes, add a picture viewer. Then press next.
  6. When you have finished your cd will have its own autorun.exe file on the cd which will start the slide show.

write files to cd
slideshow picture cd
Notes:
  • If the cd drive is not on auto play, when you insert the cd you can choose to view files and then double-click on the autorun.exe file.

Create a Custom Toolbar

If you are constantly accessing a particular folder, you can add it to your taskbar for quick access. Right click the taskbar and scroll to Toolbars, then select "New Toolbar". It will open an Explorer window, so browse to your folder and select it. It is also handy to add My Computer as a toolbar.

Disable Delete Confirmation

You can disable the confirmation that pops up whenever you are deleting something by right-clicking the Recycle Bin and selecting the Properties. Uncheck the delete confirmation box, click Apply and then OK, and you are done. Also, you can bypass the Recycle Bin entirely by holding down the "Shift" key while deleting files.

Shut Down from Your Desktop

If you are trying to eliminate every extraneous mouse click, you can shut down your computer with an icon on the desktop. Right click on your desktop, click "New" and then click "Shortcut" and Type the location of the item field, type "shutdown -s -t 00" to give you a way to shut down the computer immediately. (Change the -s to -r to create a reboot shortcut instead.)

Control Inactive System Tray Icons

You don't have to hide or show all the icons in your system tray—you can control their disappearing acts. Right-click on the taskbar and select Properties. Click on the checkbox next to "Hide inactive icons" (if it's not checked by default), then click on the Customize button. For each item on this list, you can choose "Hide when inactive," "Always hide," or "Always show" options to decide what you'll see and when.

Thursday, 11 October 2012

5 Methods To Reset Administrator Password in Windows XP

1. Use Alt, Control, Delete & The Windows Welcome Screen

If you have set your computer up to login via the Welcome Screen, there may be a slight chance that you will be able to login as the Administrator. Depending on who installed XP on your computer, there may or may not be a password on the Administrator’s account.
So simply press Alt+Control+Delete twice. You will be presented with a login box. Click OK to login without typing any user name or password in. If that doesn’t work, type in “˜Administrator‘ into the username box and press enter. If that doesn’t work, so far, you are in bad luck.
If you are able to log in, simply go to the control panel, go into User Accounts and change your password.

2. Login To Another Account & Reset The Password Through User Management (XP Professional Only)

This will only work if you have Windows XP Professional, and you can login with an account. Right click on My Computer and select Manage. Then select Local User and Groups ““> Users. Right click on your username and select Set Password. Follow the prompts and set yourself a new password.
If you can’t get into Device Manager because you don’t have a user account to get into your computer, you can try opening Device Manager from another computer. Right click on where it says Computer Management (Local) and choose Connect to another computer“¦ once you are logged in to another computer within your home network.
how to reset Windows XP password
Then enter your computer IP or Name. For example 169.168.x.x, 10.1.1.x or \\DesktopPC. (replacing x.x with your computer IP address. You can also click on Browse ““> Advance ““> Find now to browse for computers on your network.
how to reset Windows XP password
If you are granted access to the remote computer, follow the steps I mentioned above and set a new password. If not, continue reading.

3. Reset The Password Through Safe Mode & Command Prompt

If the above steps have failed so far, you can try and boot into Safe Mode. To do this, press F8 while your computer is booting. Once in safe mode, you can try going into the control panel and reset your password. If you can’t, you can try and open up a Command Prompt by opening Run and typing cmd. Enter net user [username] [enternewpassword]. For example, If I want to change my account which is Jack to password abcde, I would type in net user jack abcde and press enter. Your password should now be changed.
how to reset Windows XP password

4. Use A Live (Bootable CD)

If you are at this stage, and haven’t so far managed to get into your computer, you may want to use a Live Bootable CD. You may want to have a look at the post 3 Ways To Reset A Forgotten Windows Administrator Password and follow those steps.
Alternatively, you can use the Live CD so you can boot into your computer and access the files so you can back them up on an external hard drive or USB stick. If you can’t get into Windows, this is your only option.

5. Remove Your HardDrive, Backup, Format, Reinstall

One final way, and probably a good thing to do if your computer is running really slow, or you can’t get into Windows at all; take out your hard drive, put it into another computer, backup your data, format the hard drive, put it back into the original computer, and re-install Windows. You may want to have a look at The Idiot’s Ultimate Guide to Building Your Own PC for some help taking out your hard drive.
So these are my basic tips if I can’t get access to a computer to a user account in a Windows XP computer. I hope these tips will come in handy.
Do you have any other tips to get access to your computer because you forgot the password? Let us know in the comments.

Reset Windows Vista Password

What should you do when you forgot the password to login to Windows Vista? Ask an administrator to reset the Vista password for you. If you yourself are administrator, and you can't remember the administrator password, the problem get a little tricky, and probably hard to recover the 'forgotten password' again. Before you search for Windows installation DVD to format and reinstall Windows Vista onto the computer, here a few ways you can try to unlock the Windows to gain access to the system again, at least by resetting Windows Vista password.

Method 1: Use Windows Vista Password Reset Disk

If you did create the Windows Vista password reset disk before forgot Windows Vista password, the method will be helpful. While, there are exactly little users who remember to prepare such a useful disk. If you already have a Windows Vista password reset disk, please follow these steps to reset your Vista password easily.
Reset Windows Vista Password
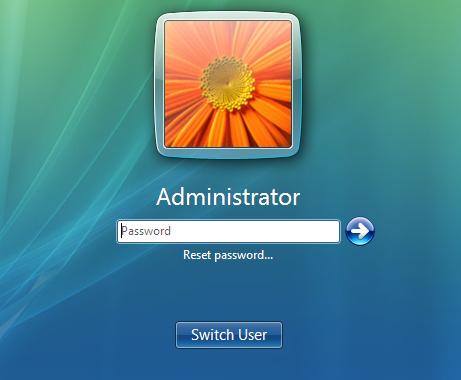
  1. Once you've typed the wrong password, Windows Vista will show a Reset password link below the login box.

  2. Click on Reset password. Make sure that password reset disk is plugged into the computer at this point.
  3. When the Password Reset Wizard appears, click Next to continue.
  4. Select the right password reset disk. Click Next.
  5. Type in a new password and a hint for the password. Click Next.
  6. Click Finish. Now you can log in to your PC with the new password.

Method 2: Reset Windows Vista Password in Safe Mode

In Windows Vista there is a hidden account called Administrator which does not show up on the login screen but it is always available for use if required. If you didn't change this Administrator's password, the password is empty by default. You can boot up in Safe Mode (by pressing F8 when your computer starts) and log on with the built-in Administrator account. After getting into Windows, you can reset any Vista account password easily!

Method 3: Use the Sticky Keys Trick to Reset Windows Vista Password

The Sticky Keys trick to restore a forgotten administrator password is reliable, easy to carry out, and does not require third-party software. All you have to do is boot up from a Windows Vista setup DVD, launch the Windows Recovery Environment (RE), and then replace the sethc.exe file with cmd.exe. You can also use this method for Windows 7, but you have to use a Vista or Windows 7 DVD.

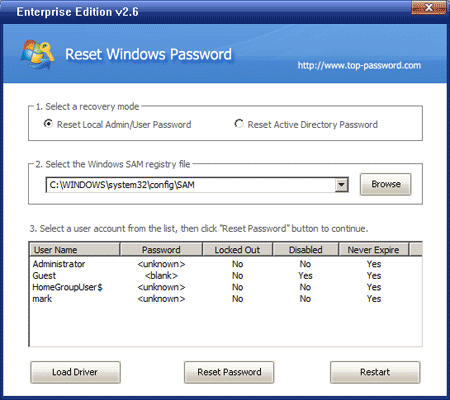
Method 4: Reset Windows Vista Password by Third-party Software

Reset Windows Password
  1. Download the self-extracting Zip file of Reset Windows Password package.
  2. Uncompress the package, there is a ISO image: ResetWindowsPwd.iso. Burn it onto a CD/DVD or USB flash drive.
  3. Boot your locked Vista computer from the newly burned CD/DVD or USB flash drive.
  4. Wait until the boot process is finished. When a window pops up with all your Windows Vista accounts, select the target one to reset its forgotten password.

Networking Tips

How to Set Up and Troubleshoot a Home Computer Network

Computer Networking TipsSetting up a home computer network may sound daunting, but it’s relatively simple, provided you break everything down into specific steps. Home computer networks are ideal for sharing a wireless connection among multiple computers, especially for those who have a home office, teenagers, or another computer configuration.

1:  Purchasing a Router

Before you begin to worry about software, worry about hardware. A excellent router, like a Cisco router or a Linksys router, will save you from having to endlessly reboot and reprogram while still allowing you to quickly set up a home network. Make sure you buy from a company that has years of experience designing high quality routers that are capable of handling high amounts of traffic (such as data heavy media files). Virtually any home network will run smoothly without irritating slowness or delays.

2:  Wireless Bandwidth

After you’ve purchased a router, the next step is to determine how much bandwidth you are receiving from your wireless connection. This becomes particularly important if you have a household where the network users are habitually downloading movies or other large data files. While a router can rapidly transfer this information, it is constrained by the amount of bandwidth available to the household. A connection that transmits data at 2.4 GHz with a 54 megabit speed is usually adequate to the task.
If your network feels exceptionally sluggish, check to make sure that you are receiving the wireless by ‘pinging’ the network. Alternatively, if you are receiving the full wireless bandwidth but are still experiencing slow results because of the types of media you are transferring, you may consider paying for a faster service.

3:  Software Drivers

While software drivers for networking are fairly easy to find and download from the Internet, purchasing software directly from a computer retailer is recommended as a way to keep your network free of faulty software. A higher incidence of spyware and viruses makes downloading free software inadvisable, especially for something as sensitive as a computer network.
Purchasing software from one of the major companies, such as McAfee or Symantec, will also provide you with another vital component of wireless home networking: a firewall. Because wireless networks are difficult to secure, the best option is to buy software that not only allows you to network, but is built specifically to keep out uninvited users. Firewalls are designed to protect your valuable information behind a tightly secured ‘wall’ which can’t be accessed unless a very specific encrypted code is used.

4:  Basic Set-Up

Now that you have all the components, you’ll want to set up the router first. Install the software driver onto each computer that will use the network. Set up a passkey that is fairly hard to break. Avoid simple or obvious terms that an outside user could easily guess. Set up each computer with this information.
The company that is providing your wireless connection will usually assign you a name and a passkey. However, in some configurations, you will be able to reprogram this information.

5:  Troubleshooting

No matter how expertly a system is set up, on occasion a technical problem manifests, resulting in a lack of connectivity for computers. There are a few ways to quickly check what’s working and what’s not.
Usually, problems are caused by one of two things: the software on the computer itself is malfunctioning, and not allowing the computer to connect. You can test this by seeing if any other computers can connect to the network. If they can, the problem is local to that computer. A simple reboot of the software should solve this problem. However, if the software continues to be unable to connect to the internet, you will need to uninstall the software, and then reinstall it. Sometimes, a version can become corrupted. By wiping it clean and starting anew, the problem should resolve itself.
The second most common problem is that the router needs a quick reboot. If you purchase a quality router, you will not have this problem very often, although every now and again even the best routers need a quick reboot. Turn the router off for at least thirty seconds. Switch it back on, and check your connectivity in about ten minutes. This gives the system plenty of time to reset itself.
If this doesn’t work, the wireless provider may temporarily be out. Call your wireless provider to determine if they are experiencing an outage, and when you can expect the resumption of service. If all of these methods don’t resolve your problem, there is a basic flaw in your initial setup.